New : smaSensor renew. (June 2024)
 mailSpeak is an Alexa skill
that displays and reads new emails to you on your Amazon Alexa® device .
echo show15 echo show8 Fire tablet
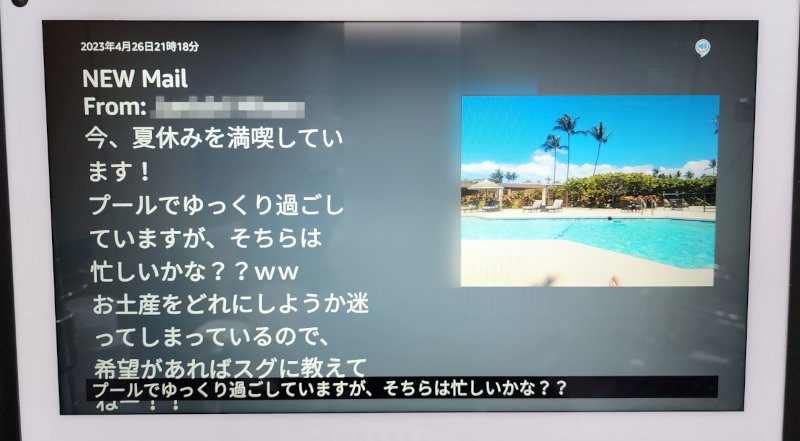

 New emails will only be delivered to the specified Alexa, and only people in that room will be notified. It is a new service that has never existed before, such as forwarding incoming e-mails or using it as an
e-mail that disappears only when you are in the room .
 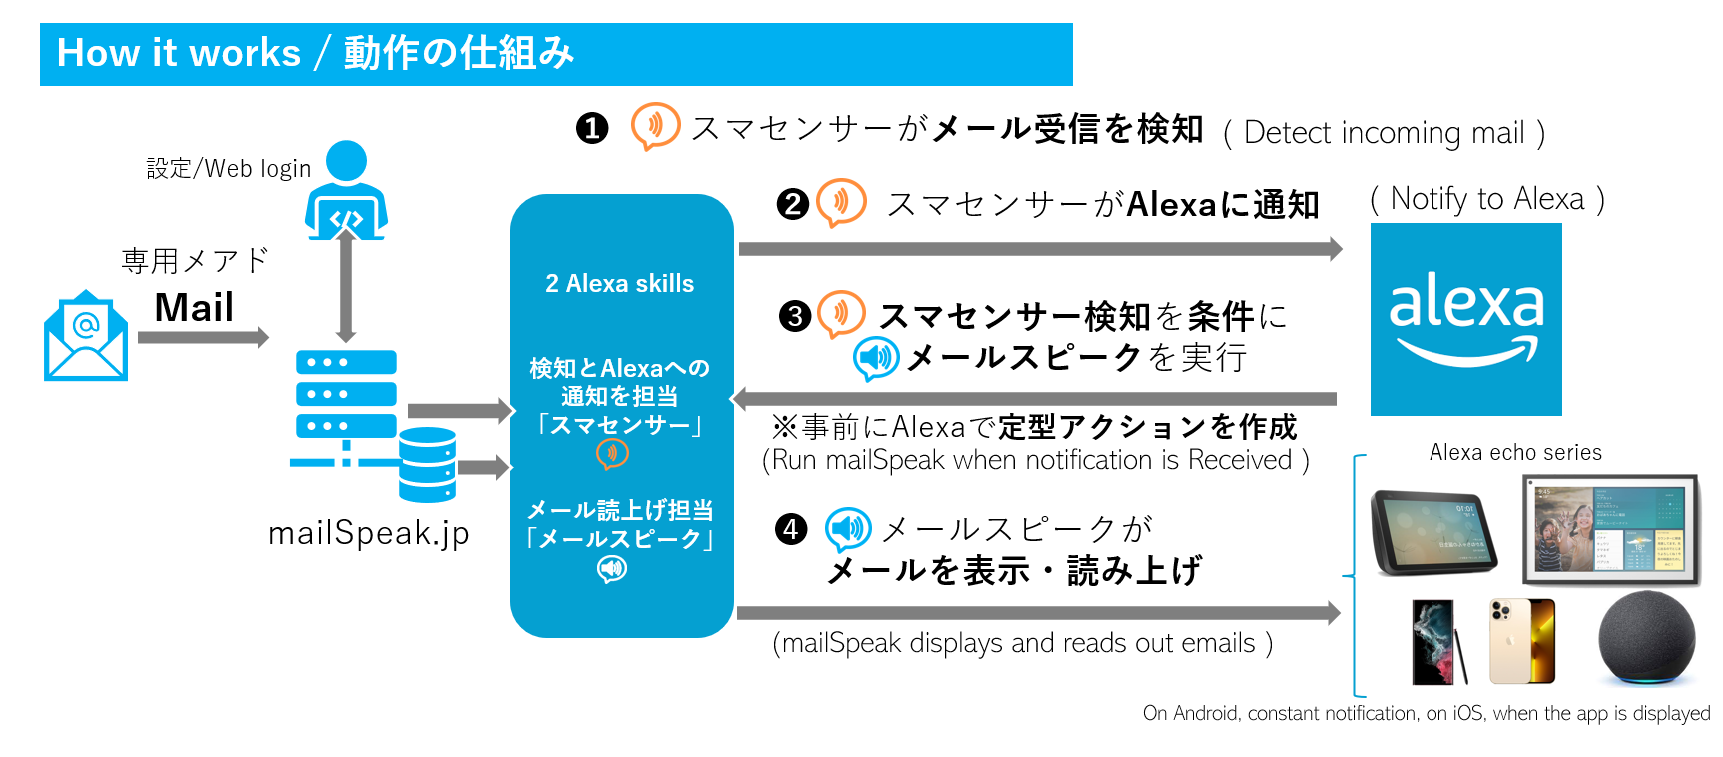 The system is complex, but it's simple to use.
When you create a new Mailspeak account, a Mailspeak dedicated email address is automatically generated. And by enabling the Mail Speak skill and linking your account, you can read out and display the emails received at your dedicated email address.
If you have some IT knowledge
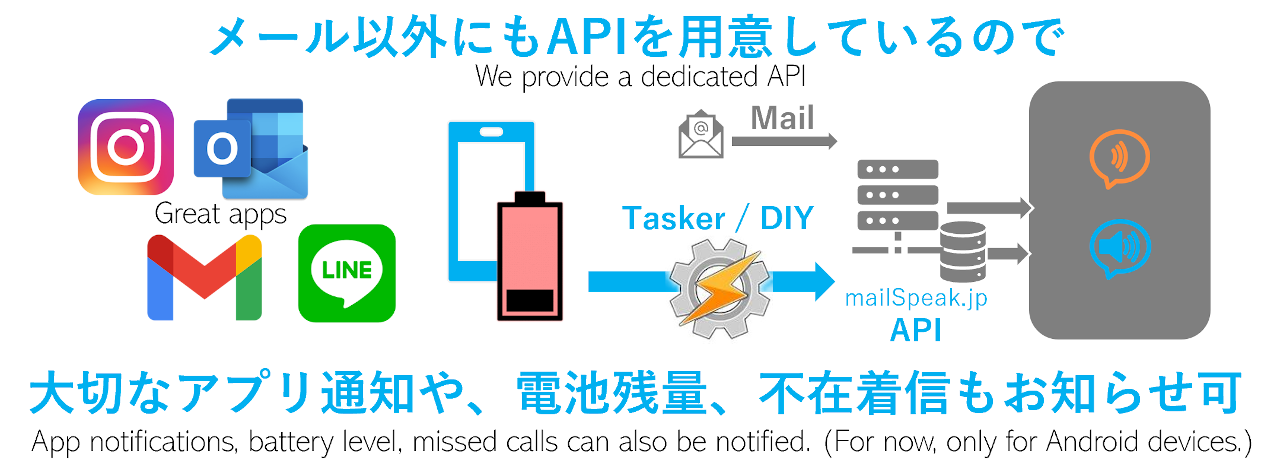
If you read not only emails but also smartphone "notifications" and transfer them to the emailspeak API
LINE® or messenger notifications, low battery, missed calls, etc.
You may be able to quickly respond to important messages on your smartphone even at home.
※ Android app Tasker
tasker setting sample
tasker setting sample

How to set up mailSpeak
1) Find mailSpeak from Alexa App Skills and link your account. Account linking requires new account registration with Mailspeak , so please follow the instructions. When you create a new account, an e-mail address for receiving e-mailspeak will be automatically issued. * You can check your email address at any time by logging in with your account.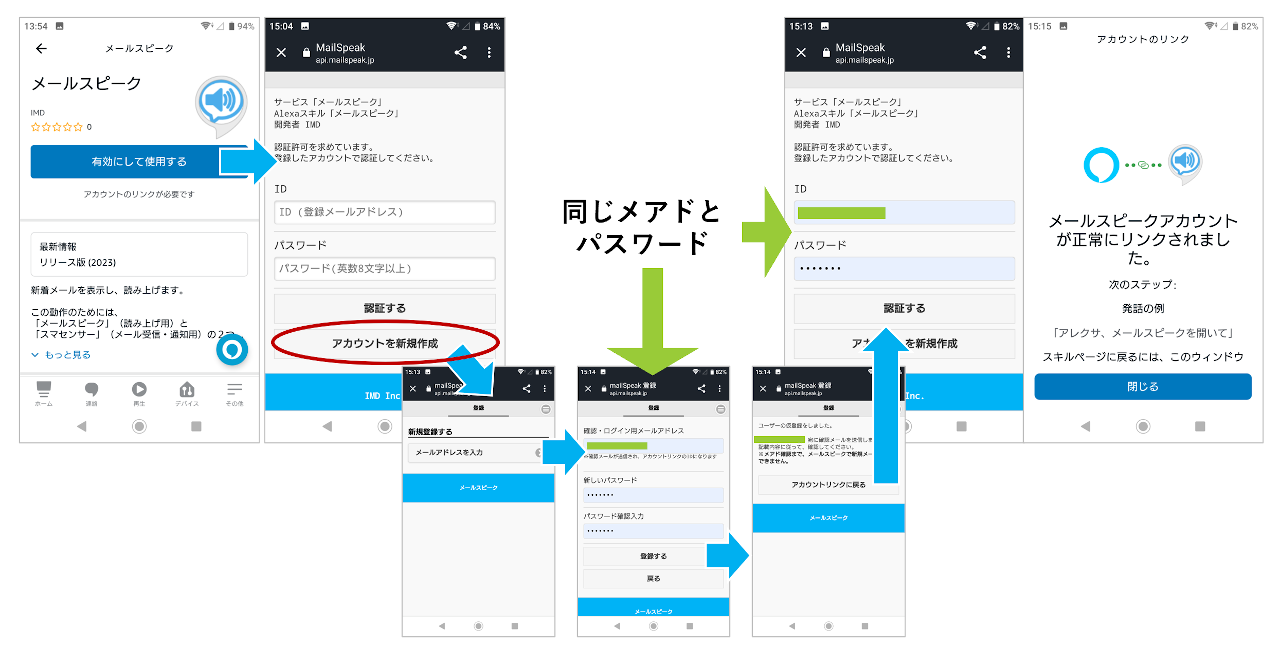 2) Next, search for the smaSensor skill from Alexa app skills and enable it. Again it says "account linking required". You should have already created an account with Mailspeak, so please enter the ID (registered email address) and password you used to register your account.
(Note) This is not a receiving email!
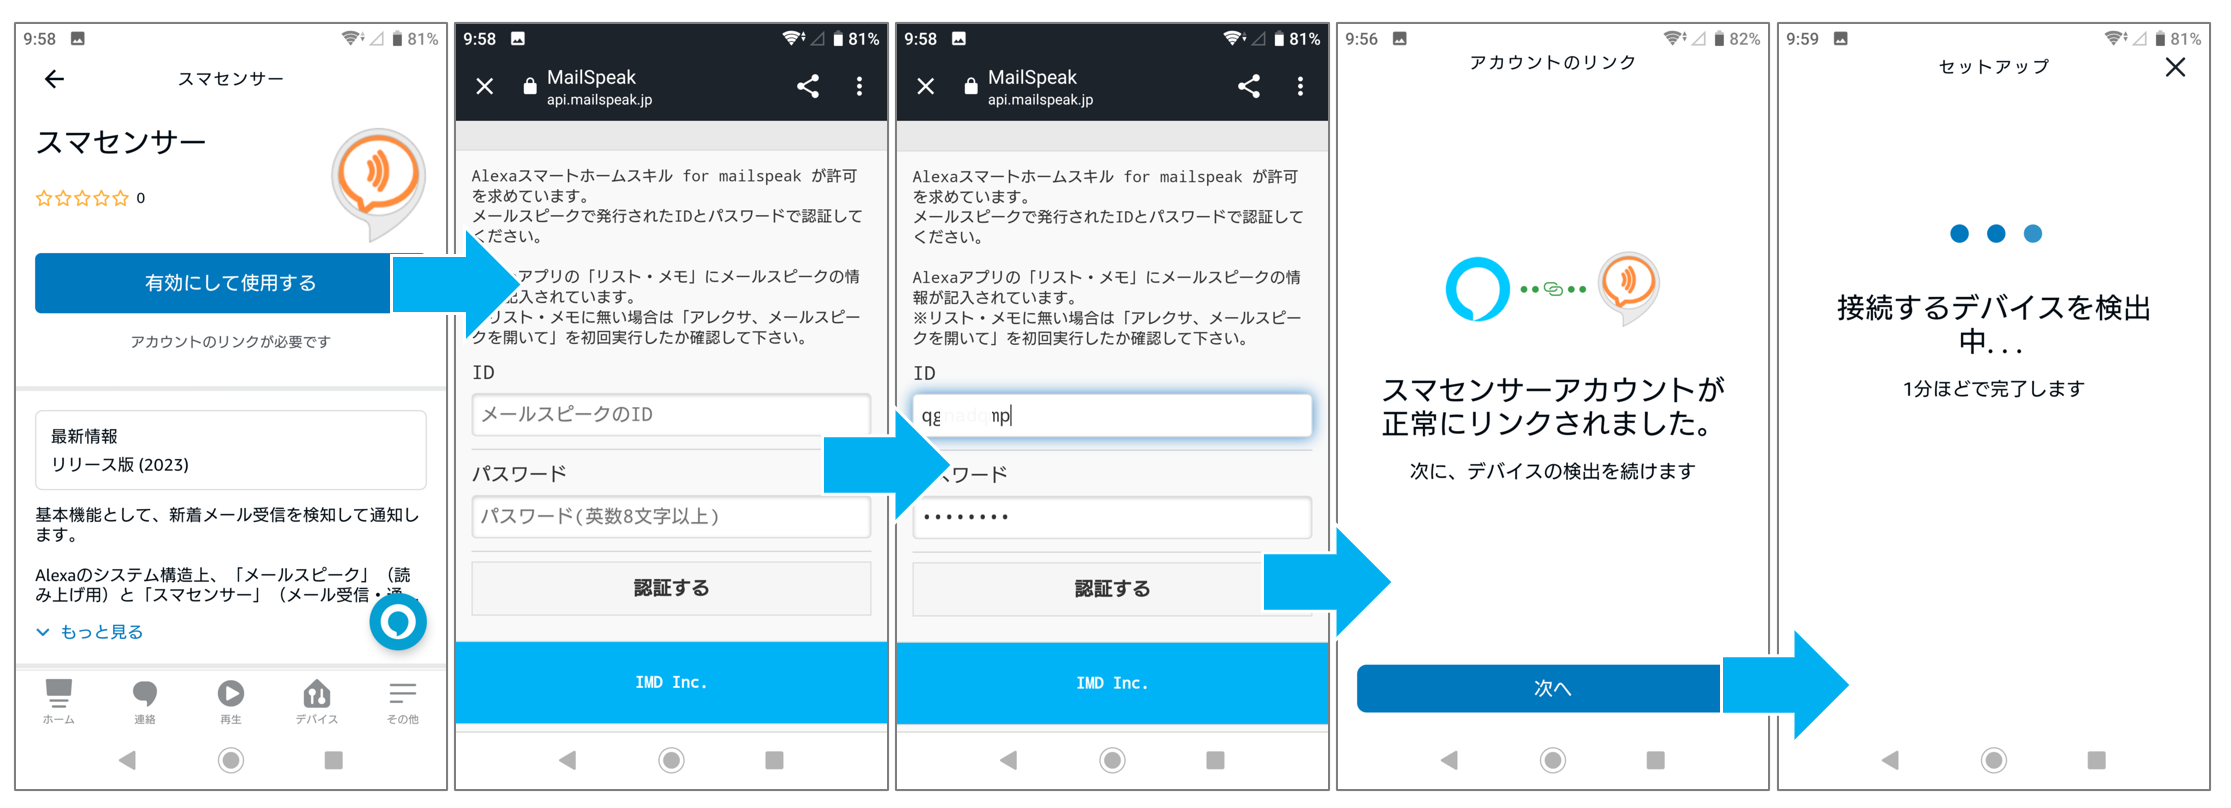 After successful account linking, when you proceed to device detection, IMD's "smaSensor" (motion sensor) and "Smart button" (switch) will be recognized by Alexa, so please complete the setup. (It doesn't matter where you install it.) MailSpeak and SmartSensor are now working together!
When you receive an email addressed to your mailspeak, the smaSensor will "detect" (react) as a smart home motion sensor.
(Only "detection" is valid in the motion sensor settings. Undetected time does not work)
3) Create a new Alexa standard action.
sample routine action * When you load the sample, the Alexa app will start, and you can save the standard action simply by selecting the motion sensor (email detection) as the execution condition and selecting the Alexa device to be executed. Normally, go to Create new from "Standard action" in the "Other" tab of the Alexa app, and select "Email detection" ("Detection" with motion sensor) from smart home as an execution condition. As an action, select "Mail Speak" in "My Skills" from Skills. Decide the name of the fixed action as you like and save it.4) When Mail Speak receives an email, the smaSensor will notify you, Mail Speak will be executed, and the new email will be read out and displayed.
If you want to check the operation of the smaSensor, say to Alexa, "Alexa, activate the smart button." A message will appear if this is the case.
Various settings such as reading speed and number of lines to be read can be set in advanced settings .
5) Forward your email.
Your email environment will vary greatly depending on whether you are an individual or a business user, but if you can forward emails yourself, skip this section. However, with Gmail forwarding, a confirmation URL is sent to the forwarding destination, and the forwarding will not be possible unless you step on it. If you are not familiar with this common knowledge, you may want to check out the introduction below. We will introduce the forwarding method when using the following major mailers.NEW You can now check forwarded emails (Mail log) from advanced settings . .
 Even if you use advanced functions such as API, you can add a device access point as an API from the detailed settings, so you can link IoT devices such as Arduino and Raspberry Pi, and connect your own motion sensor etc. to Alexa . You can also. * Operation confirmed with Arduino M5/Atom/Stamp etc. (mailSpeak API connection via https/SSL)

Specifications overview
-mailSpeak ends after reading out one new email each time the skill is activated. In other words, if you start Mail Speak again when there is no new mail, it will read the previous mail. (Maximum 100 cases) Finally, "There is no mail". Emails read aloud are not saved. If you want to check the contents of the read-out email, please check "Activity" in the "Other" tab of the Alexa app. The characters displayed on the screen are temporarily saved as history. ・Reading by voice and text display for Alexa with a screen (including Fire tablet) are supported. ・Please log in to Mailspeak and specify the mail reception filter, read aloud, and display content conditions (speed, how many lines to read, skip conditions, etc.). ・Quoted-printable is supported. ・Some attachments can be converted to images and displayed on Alexa. - Supports some Microsoft Office file formats, PDF, PNG, JPEG, etc. - Capacity is less than 500KB and does not support multiple files. Only emails with MIME attachments that MailSpeak can recognize will be displayed. - It may take time to convert the attached file to an image and send it to Alexa.
Note
・In principle, HTML mail is not supported ・Pictograms and special characters are not supported. ・If you convert from HTML to plain text, you may be able to display part of it.
*Even if you have processed the reception, if the text of the email cannot be read, it may respond with "There is no email". ・Please do not disclose your assigned email address. If you receive a large amount of e-mail, we may refuse or stop using it without notice. ・mailSpeak also has a reception filter function, but please use it efficiently by applying a forwarding filter in advance. - Mail Speak may not be decoded correctly depending on the multipart mail structure. ・The reading voice can be changed in Alexa's description language, but it seems that the character size of the display cannot be changed at present, so the display content is limited on small screen devices such as echo show5.
*Overwhelmingly, we recommend using echo show 15.
However, echo show 15's invocation recognition seems to be inferior to other echo shows, and may not recognize "open mailspeak". (In that case, please use the Alexa app on your smartphone or use another echo show) ・If you touch the echo screen while reading, the reading will stop. (In advanced settings, you can issue a URL to stop reading halfway, or set silent mode without sound.) ・For Fire tablets, it seems that you can use it in landscape orientation by setting echo show mode. ・When the Fire tablet is in echo show mode, if the screen sleep time is exceeded, the mail-speak screen will not be displayed. *This is not necessary for the echo show series. ・If it is an Android smartphone, it seems that the read-out notification is supported by the Alexa app, but on iOS it will not work unless the Alexa app is displayed in the foreground and the screen is not in sleep mode. ・Since the specification of Alexa operation may be changed suddenly, the continuation of this service depends on it. ・We plan to charge a fee to maintain this service, but we have not decided anything, considering options such as advertisements. Please be assured that you will not be charged automatically.

support
・It's free now, so please do your best. I'm sure you can do it! ・Please send any bugs or positive requests to Web Support . *Please do not expect a reply.ℹ Development history
© 2023 mailSpeak.jp
