
Alexaが新着メールを読む Alexa reads new emails.
スマホの通知をハンズフリーでキャッチ!
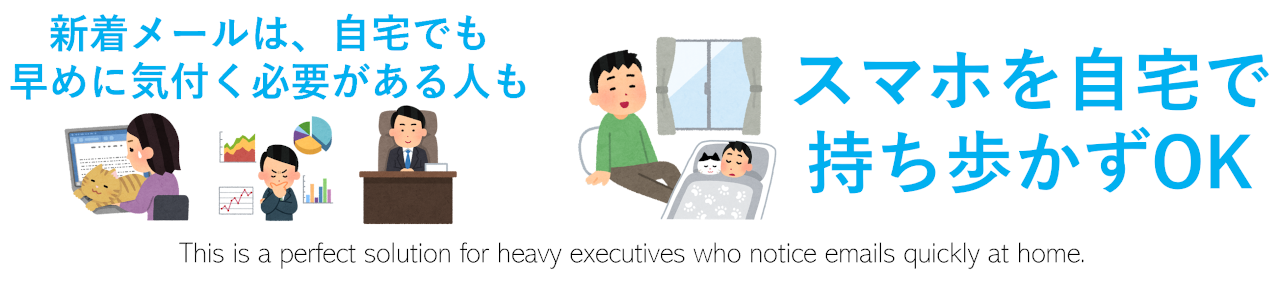
家事や仕事をしながら、
いつでも最新情報をゲット
Catch smartphone notifications hands-free!
Get the latest info while doing chores or working.
大型リニューアル!新機能が登場 Major Renewal! New Features Arrived
管理画面が大幅に進化し、より便利に、より高度な使い方が可能になりました。 The management screen has evolved significantly, enabling more convenient and advanced usage.
高度なメールフィルタ Advanced Mail Filter
送信元、件名、サイズ、添付ファイルの有無などでメールを振り分け。必要なメールだけを通知したり、迷惑メールを自動破棄したりできます。ホワイトリスト運用も可能です。 Sort emails by sender, subject, size, attachments, etc. Notify only necessary emails or automatically discard spam. Whitelist operation is also possible.
スマートホーム連携強化 Enhanced Smart Home Integration
メール受信をトリガーに家電を操作。「Webhook」を使えば、自作IoTデバイスとの連携もURL一つで簡単に実現できます。 Operate home appliances triggered by email reception. With "Webhook", integration with self-made IoT devices is easily realized with a single URL.
メールスピークの主な特徴 Main Features of mailSpeak
新感覚のメッセージ体験を、あなたの日常に。 A new messaging experience for your daily life.
ハンズフリー通知 Hands-free Notification
家事や作業中でも、Alexaが新着メールを音声でお知らせ。スマホを確認する手間が省けます。 Alexa announces new emails by voice even while you are doing housework or working. Saves you the trouble of checking your smartphone.
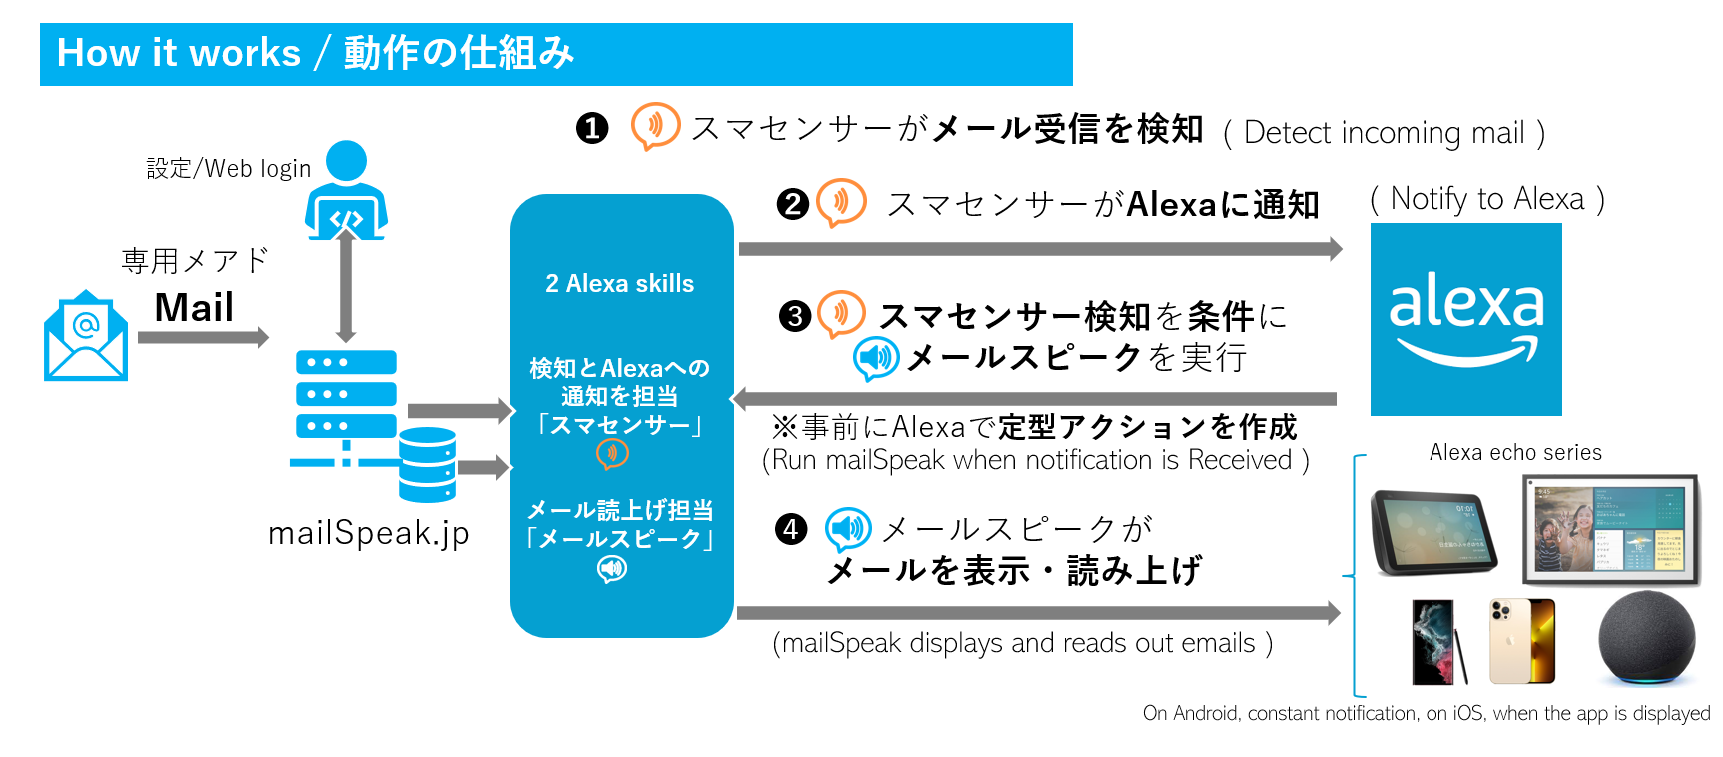
シンプルな仕組み Simple Mechanism
「メールスピーク」と通知用の「スマセンサー」の2つのスキルで動作。設定も簡単です。 Works with two skills: "mailSpeak" and "SmaSensor" for notifications. Setup is easy.

高度な連携機能 Advanced Integration
APIを活用すれば、スマホ通知やIoTデバイスからの情報もAlexaに届けられます。 Utilize the API to deliver smartphone notifications and info from IoT devices to Alexa.
かんたんセットアップ Easy Setup
いくつかのステップで、すぐ利用できます。 You can start using it immediately in a few steps.

Step 1: メールスピーク スキルの有効化とアカウント作成 Step 1: Enable mailSpeak Skill and Create Account
Alexaアプリのスキルから「メールスピーク」を探して有効化し、アカウントリンクを行ってください。アカウントリンクには、メールスピークへの新規登録が必要です。 Find and enable "mailSpeak" from Alexa app skills, and perform account linking. Account linking requires new registration to mailSpeak.
アカウントを新規作成すると、メールスピーク受信用メールアドレスが自動発行されます。管理画面へログインするといつでも確認できます。 When you create a new account, a mailSpeak receiving email address is automatically issued. You can check it anytime by logging in.
管理画面の詳しい操作方法はこちら Click here for detailed operation of the management screen
Step 1 のまとめ Step 1 Summary
-
1
Alexa本体とセットアップ Alexa device and setupAmazon Alexa echoシリーズや Alexa 付き FireTVシリーズなどで、できれば画面付きが推奨 Amazon Echo series or Alexa-enabled Fire TV devices; a screen model is recommended if possible
-
2
Alexaアプリ Alexa appAmazon Alexaアプリ Amazon Alexa app
-
3
メールスピーク mailSpeakAlexaアプリのスキルから探してアカウントリンク Find it in Alexa skills and link your account
-
4
メールスピーク登録用の自分のメアド Your email address for mailSpeak registrationGoogle ID でログインが簡単 Google ID makes login easy
※生体認証/パスキー対応 *Supports biometrics / passkeys
-
1
メールスピーク・スキル mailSpeak skillAlexaとアカウントリンクして使える状態 Ready to use via Alexa account linking
-
2
メールスピークのメアド Your mailSpeak address@mailSpeak.jp の受信専用メアド A @mailSpeak.jp receive-only address
Step 2: スマセンサー・スキルの有効化 Step 2: Enable SmaSensor Skill
次に「スマセンサー」スキルをAlexaアプリから探して有効化します。再びアカウントリンクが求められますので、Step 1の自分のメアドとパスワードと同じもの(又は同じ Google ID でログイン)を入力してください。 Next, find and enable the "SmaSensor" skill from the Alexa app. Account linking will be requested again, so please enter the same email and password as in Step 1 (or log in with the same Google ID).
(ご注意)アカウント登録時のメールアドレスをご入力ください。メールスピーク受信用アドレスではありません。 (Note) Please enter the email address used for account registration. Not the mailSpeak receiving address.
アカウントリンク成功後、デバイス検出に進むとIMDの「スマセンサー」(モーションセンサー)と「スマボタン」(スイッチですがAlexa審査に必要なだけで使いませんw)が認識されます。これらをセットアップして完了です。 After successful account linking, proceed to device discovery, and IMD's "SmaSensor" (motion sensor) and "SmaButton" (switch) will be recognized. Set these up to complete.
ご注意:スマセンサーで自動作成される仮想人感センサーデバイスの名称は「スマセンサー」か「メール検知」か「メール着信」です。開発世代毎に違うのでご了承下さい。 Note: The auto-created virtual motion sensor device name may be "SmaSensor", "Mail Detected", or "Mail Received" depending on the app version.
デバイスの名称は管理画面のスマートホームデバイス一覧から後で確認・変更・追加できます。 You can later check/change/add device names from the Smart Home device list in the management screen.
Step 2 のまとめ Step 2 Summary
-
1
スマセンサー SmaSensorAlexaアプリのスキルから探してアカウントリンク Find it in Alexa skills and link your account
-
1
スマセンサー登録用の自分のメアド Your email for SmaSensor registrationメールスピークの登録と同じもの Same as your mailSpeak registration email
-
1
スマセンサー・スキル SmaSensor skillAlexaとアカウントリンクして使える状態 Ready to use via Alexa account linking
@mailSpeak.jp でメールを受信すると「スマセンサー」仮想スマートホームデバイスが検知したことになる重要なスキル Important: when an email is received at @mailSpeak.jp, the virtual smart home device "SmaSensor" is treated as "detected"
Step 3: Alexa 定型アクションの作成 Step 3: Create Alexa Routine
Alexaアプリの「その他」→「定型アクション」から新規作成します。 Create a new one from "More" -> "Routines" in the Alexa app.
実行条件として、スマートホームから「スマセンサー」(モーションセンサーで「検知」)を選択し、アクションとして、スキルから「マイスキル」にある「メールスピーク」を選んでください。 Select "SmaSensor" (Motion Sensor "Detected") from Smart Home as the trigger condition, and select "mailSpeak" from "Your Skills" in Skills as the action.
定型アクションのサンプルはこちら Sample Routine Hereこれで、メールを受信すると自動でAlexaが読み上げるようになります! Now, when you receive an email, Alexa will automatically read it out!
Step 3 のまとめ Step 3 Summary
-
1
なし None
-
1
あなた専用の @mailSpeak.jp メアドでメールを受信すると Alexa でお知らせされる When an email arrives at your @mailSpeak.jp address, Alexa notifies you
ヒント: Hint:
Alexa はできれば大きな画面付きがお勧めです。
添付画像や資料があった時に一緒に表示できるので、ちょっと感動できると思いますよw
If possible, we recommend an Alexa device with a larger screen. It can show attached images and documents together, which feels pretty impressive.
Step 4: 動作確認 Step 4: Operation Check
ご自身のメールスピーク用アドレスにテストメールを送ってみてください。正しく設定されていれば、指定したAlexaデバイスがメールを読み上げます。 Try sending a test email to your mailSpeak address. If set up correctly, the specified Alexa device will read out the email.
ヒント: Hint:
Alexaに『アレクサ、スマボタンを起動して』と話しかけると、スマセンサーの動作を手動で確認できます。 You can manually check the SmaSensor operation by saying "Alexa, turn on SmaButton".
Step 5: メール転送設定 (任意) Step 5: Mail Forwarding Settings (Optional)
Gmailなどの既存メールアドレスに届いたメールを読み上げたい場合は、メールスピーク用アドレスへの転送設定が必要です。 If you want to read emails arriving at existing email addresses like Gmail, forwarding settings to the mailSpeak address are required.
NEW:
マイページ内に「読上メールログ」を新設しました。転送設定時の確認リンクのクリックなどにご利用ください。 "Read Mail Log" has been newly established in My Page. Please use it for clicking confirmation links during forwarding settings.
メジャーなメーラーの転送設定方法は以下をご確認ください。 Please check the following for forwarding settings of major mailers.
Gmailの転送設定 Gmail Forwarding Settings
PC版Gmailでのみ設定可能です。[設定]→[すべての設定を表示]→[メール転送とPOP/IMAP]タブの順に進み、「転送先アドレスを追加」にメールスピーク用アドレスを入力します。転送先に届いた確認メールのリンクをクリックして認証を完了させてください。 Configurable only in PC version Gmail. Go to [Settings] -> [See all settings] -> [Forwarding and POP/IMAP] tab, and enter the mailSpeak address in "Add a forwarding address". Click the link in the confirmation email sent to the forwarding address to complete authentication.
Outlookの転送設定 Outlook Forwarding Settings
デスクトップ版では[ファイル]→[仕分けルールと通知の管理]から設定します。Web版では設定(歯車アイコン)→[メール]→[転送]で設定できます。 In desktop version, set from [File] -> [Manage Rules & Alerts]. In Web version, set from Settings (gear icon) -> [Mail] -> [Forwarding].
その他のメーラー Other Mailers
Thunderbirdでは「メッセージフィルター」、Yahoo!メールでは「メールの自動転送」機能を利用して設定します。 In Thunderbird, use "Message Filters", in Yahoo! Mail, use "Automatic Mail Forwarding" function.
サービス仕様とご注意 Service Specs and Notes
主な仕様 Main Specs
詳細な仕様はこちら Detailed Specs Here
| 基本動作Basic Operation | スキル起動毎に、新着メール1通を読み上げて終了します。Reads one new email per skill activation and ends. |
| 再起動時On Restart | 新着がない場合、1件前のメールを読み上げます(最大10件)。If no new mail, reads the previous email (max 10). |
| メール保存Mail Storage | 読み上げたメールはサーバーに保存されません。Read emails are not stored on the server. |
| 読上げ確認Read Confirmation | Alexaアプリの「アクティビティ」で履歴を確認できます。Check history in Alexa app "Activity". |
| メール形式Mail Format | quoted-printable 形式のメールに対応しています。Supports quoted-printable format emails. |
| 添付ファイルAttachments | Office系, PDF, 画像(PNG, JPEG)等の一部を表示可能。容量制限あり。Can display some Office, PDF, Images (PNG, JPEG). Capacity limit applies. |
ご注意 Notes
ご利用前の注意点 Precautions before use
- HTMLメール、絵文字、特殊文字には原則対応していません。HTML emails, emojis, special characters are generally not supported.
- 割り当てられたメールアドレスは公開しないでください。Do not publish the assigned email address.
- 短時間に大量のメールを受信した場合、一時的に利用を制限することがあります。If a large number of emails are received in a short time, use may be temporarily restricted.
- Alexaの仕様変更により、本サービスの動作が影響を受ける可能性があります。Service operation may be affected by Alexa spec changes.
- 読み上げ中に画面をタッチすると停止します。Stops if screen is touched during reading.
- Echo Show 15でのご利用を特に推奨します。Use with Echo Show 15 is especially recommended.
よくあるご質問 (FAQ) FAQ
新規登録したメアドに確認メールが届きません I didn't receive the verification email
確認メールが見当たらない場合、まずは 迷惑メール や ゴミ箱 をご確認ください。Gmailをご利用の場合は プロモーション / ソーシャル タブに振り分けられていないかも確認してください。 If you can't find the verification email, please check your Spam/Junk and Trash folders first. If you use Gmail, also check the Promotions / Social tabs.
また、メールアプリやキャリア側の 受信拒否 設定、フィルタ(自動振り分け)、ドメイン指定受信などの設定によりブロックされていることがあります。 Also, the message may be blocked by your mail app or carrier settings such as blocked senders, filters (auto-sorting rules), or allowlist/denylist settings.
それでも届かない場合は、登録方法として Google IDでログイン(Google OAuth)をお試しください。メール認証の手順が不要になり、スムーズに開始できることがあります。 If it still doesn't arrive, try signing in with your Google account (Google OAuth). This can help you get started smoothly without the email verification step.
Gmailから転送しているのにメールが届きません Mail not arriving even though forwarding from Gmail?
Googleから送信された確認(認証)用のリンクをクリックしましたか?
マイページ内にある「読上メールログ」で確認できます。
Did you click the confirmation (authentication) link sent from Google?
My Page.
Gmailからの転送設定では、Googleが確認用メールを送信し、メール内のURLをクリックすることで転送設定が完了します。 このURLをクリックしないと転送は有効になりません。クリック後にGmail側で「転送先アドレスを確認しました」と表示されます。 この確認手順はGoogle側の仕様であり、クリックして Not found と表示された時は、それは Google が表示していますので、URL を見てみましょう。 In Gmail forwarding settings, Google sends a confirmation email, and forwarding is completed by clicking the URL in the email. Forwarding will not be enabled unless this URL is clicked. After clicking, "Forwarding address confirmed" will be displayed on Gmail side. This confirmation procedure is Google's specification. If "Not found" is displayed after clicking, it is displayed by Google, so let's look at the URL.
よくあるユーザ側の問題例: Common user-side issues:
- 複数のGoogleアカウントを使用している場合、正しいアカウントでログインしているか確認してください。(異なるアカウントでログインしているブラウザでアクセスすると拒否されることがあります)If using multiple Google accounts, check if you are logged in with the correct account. (Accessing with a browser logged in with a different account may be rejected)
- Googleアカウントに2段階認証を設定している場合、追加の認証が必要になることがあります。If 2-step verification is set on Google account, additional authentication may be required.
- Googleアカウントがビジネス用(G Suite)で管理者が外部サービスへの転送を禁止している場合があります。Google account may be for business (G Suite) and administrator may prohibit forwarding to external services.
- Googleアカウントがロックされているなどの理由で転送設定ができないことがあります。Forwarding settings may not be possible because Google account is locked etc.
それ以外の理由なども含め情報提供している場合がありますので、 メールスピーク公式アカウントもあわせてご確認ください。 We may provide information including other reasons, so please also check mailSpeak Official Account.
認証リンクが途中で切れている場合は、マイページ設定の「スキル・読み上げ」にある「本文最大読上げ行」を増やしてお試しください。 If the authentication link is cut off in the middle, please try increasing "Max Read Lines of Body" in My Page settings "Skill / Reading".
どうしてもダメな場合は、再度、Gmailの転送設定からやり直して、発行される URL を変更してみましょう。(URLに特殊な文字が含まれている場合など) If it still doesn't work, try redoing from Gmail forwarding settings and changing the issued URL. (e.g. if URL contains special characters)
料金はかかりますか? Is there a fee?
現在はすべての機能を無料で提供しています。
Alexaが継続的に利用できるか不明なため、無料での提供を続けています。
Alexaが AI 有料プランを米国で開始しているので、日本でも開始された場合には継続性があると判断して、有料化を検討するかも知れません。
その場合でも自動的に課金されることはありません(無理ですね)のでご安心ください。
Currently all features are provided for free.
We continue to provide it for free because it is unclear whether Alexa can be used continuously.
Since Alexa has started a paid AI plan in the US, if it starts in Japan, we may judge that there is continuity and consider charging.
Even in that case, you will not be charged automatically (it's impossible), so please rest assured.
開発の経緯を知りたい Want to know development history
メールスピークは、リモートワークが中心のITエンジニアが「自宅のどこにいても重要な通知を逃さないようにしたい」という思いから開発されました。 mailSpeak was developed from the desire of IT engineers centered on remote work to "not miss important notifications no matter where they are at home".
スマホを持ち歩かなくても、Alexaを通じて迅速に情報を受け取ることで、業務効率と生活の質の向上を目指しています。特にEcho Show 15の登場が、このサービスの可能性を大きく広げました。 We aim to improve work efficiency and quality of life by receiving information quickly through Alexa without carrying a smartphone. The appearance of Echo Show 15 especially expanded the possibilities of this service.
IMD社は1999年に世界初のモバイルWebメール「MoCo」をリリースして以来、メッセージングサービスの開発に携わってきました。その経験と技術を活かし、スマートホーム時代に新たな価値を提供します。 IMD released the world's first mobile webmail "MoCo" in 1999 and has been involved in the development of messaging services since then. Utilizing that experience and technology, we provide new value in the smart home era.

サポート Support
現在は無料でサービスを提供しておりますため、 詳細な個別サポートは限定的となりますが、ご不明な点がございましたら、まずこのページのFAQをご確認ください。 解決しない場合は、Web Supportよりお問い合わせください。 Since we currently provide the service for free, detailed individual support is limited, but if you have any questions, please check the FAQ on this page first. If not resolved, please contact us from Web Support.
バグの発見や機能改善のご要望もお待ちしております。 We also welcome bug reports and feature improvement requests.